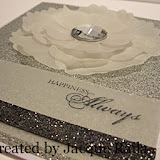
 I made this clean and simple card a few weeks ago and wanted to share how easy it is to do this kind of embossing with the Big Shot - Select Embossing - where I embossed inside an embossed frame. If you have questions, feel free to send me an e-mail or comment and I'll try to help.
The first tip I have for using the Designer Frames Textured Impressions Embossing Folders is to
 adhere a piece of cardstock, cut just smaller than the folder, to the back of your Designer Frames folder. This will help eliminate that slight line you get on your embossed cardstock, which is from the edge of the Designer Frames folder. I drop down to the 'no tab' of the Multi-Purpose Platform when I use the Designer Frames folder with the cardstock shim attached to the back. Here's a picture of the front, you can see the piece of Marina Mist cardstock adhered to the back of the folder.
 Now, on to doing some Select Embossing. The Big Shot embosses using pressure, so if you change where the pressure is applied, you can control where the Big Shot embosses. For Select Embossing inside the Oval Designer Frame, I first created a chipboard oval cutting plate substitute using the Extra Large Oval Punch - formerly known as the Wide Oval Punch. To create this, I punched out several layers of a lightweight chipboard with the Extra Large Oval Punch and then glued them together to create a thick stack.

Then I embossed the Oval Designer Frame onto a piece of Whisper White cardstock. Now, place this embossed piece inside the Flower Garden Textured Impressions Embossing Folder so that the flower you like is showing inside the embossed oval frame.

Close the folder and then use a tiny bit of adhesive to attach the Oval chipboard piece to the Embossing Folder so that it lines up with the embossed oval on the cardstock - you can see through the folder to the embossed cardstock.
 The chipboard piece is a substitute for the bottom cutting plate. So your sandwich is Multi-Purpose Platform, Oval Chipboard (adhered to the folder), Flower Garden Folder (cardstock inside), and Top Cutting Plate. Run this through the Big Shot - you might have to play with the tabs on the Multi-Purpose platform to get the right pressure, depending on the thickness of your oval chipboard. For the thickness of my chipboard piece, I used the Multi-Purpose Platform on Tab 2.You don't want too much pressure for this step, just enough to get the flower embossed.
Play with the Select Embossing Technique and be sure to share your beautiful creations!


My Stampin' Events
Current Stampin' Up! Promotions
Mary Rindal is an Independent Stampin' Up! Demonstrator in Greenwood Village, Colorado.


3 comments:
Thanks for the tutorial - and the email - it makes sense to see it in pictures, guess I'm a visual learner!
This is such a simple-beautiful card.
THANK YOU for sharing this tutorial ... this looks lovely! I'm going to give this a try today!
Post a Comment