 Last weekend I was part of the Stampin' Addicts Birthday Blog Hop to celebrate the First Birthday of the Stampin' Addicts website. StampinAddicts.com is a free website dedicated to supporting Stampin' Up! stampers and demonstrators alike. Their motto is "Positively Creative! Positively Stampin' Up!". They welcome all crafters and only ask that you maintain a positive outlook and most importantly HAVE FUN... Oh, and you're sure to make some great new friends there as well!
This month Stampin' Addicts is celebrating their First Birthday with some fun contests, so be sure to stop by their Forums and participate in the contests and don't miss all the stampin' inspiration in the Gallery as well! And give me a shout out if you're there - MaryR.
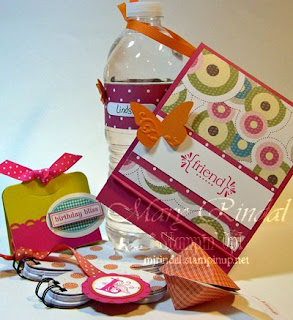
Here's a closer look at some of the Birthday Favors I created last weekend and some tips to make them. Use Stampin' Up! Designer Series Paper to carry your Party Theme throughout the decorations and favors - I used the Sweet Pea Paper Stack from the Stampin' Up! Occasions Mini Catalog for all my Birthday Favors. I love the coordinating colors and patterns.
 My favorite favor in this ensemble is probably the Matchbook Treat. This is an easy card to create and it accommodates just a note or bulkier items like the candy and drink mix here. Start with an 11" x 4 1/4" piece of cardstock, just as you would for a regular A2 sized card. Score it at 1" and again at 6 1/2" to create the Matchbook fold. I stapled the bottom fold three times, once in the middle and then on each side. The front flap tucks into this fold area.
 Roll the top of the bottom portion fold back onto itself to create a little lip. I use the tip of my Paper Piercer to help get a tight roll. Decorate the front of the Matchbook Card, remembering that the lower edge will be tucked into the bottom fold, so work with that margin as you decorate. My Matchbook Treat included a drink mix, so I punched a hole on the back of the card and tied a ribbon to it to hang off the water bottle.
Recipe:
Stamps: With All My Heart
Cardstock: Melon Mambo, Whisper White, Pumpkin Pie, Sweet Pea DSP
Ink: Melon Mambo
Accessories: Beautiful Wings Embosslit, Pumpkin Pie 1/4" Grosgrain Ribbon
 TIP: Wrap a narrow strip of pattern paper around the drink bottles to instantly coordinate with your party theme. Add a Word Window punch to this wrap and you have ID's for each drink, too. This works for adult parties as well as children's parties.
I added a tiny butterfly from the Beautiful Wings Embosslit to the water bottle, too. I just love this set of butterflies and have to resist adding them to every project! But it does tie in the decor from the Matchbook Treat right over to the Water Bottle.
 This Chapstick Holder is a fun way to add another Party Favor, whether you add a tube of Chapstick Tube inside it, or just a few pieces of chocolate - Hershey Nuggets fit well. I cut two pieces of Crushed Curry cardstock with the wider tag on the Two Tags die for the Big Shot. For the tubes of chapstick, I lined up the score line on the tags at the 1" mark on my Paper Cutter and cut off the bottom of both tags. Fold on the score lines and glue the bottoms of the two tags together to create the triangle treat holder. Decorate the front and add a Mini Glue Dot to the tube of Chapstick to keep it in place. Tie closed with a piece of Ribbon.
TIP: When creating 3D items, be sure to use a strong adhesive such as Sticky Strip or Tombow Mono Multi Glue.
Recipe:
Stamps: Birthday Bliss
Cardstock: Crushed Curry, Melon Mambo, Whisper White
Ink: Bermuda Bay, Melon Mambo
Accessories: Two Tags Die for the Big Shot, Wide Oval Punch, Scallop Trim Border Punch, Melon Mambo Polka Dot Ribbon
 These little Fortune Cookie favors are super quick and easy to make. Cut several circles from pattern paper - I used the Circle Die for the Big Shot to make several at once. Fold the circle in half and make a light crease along the fold line. Open this and then fold in the opposite direction, again make a light crease along the fold line. Put a Mini Glue Dot in the outside center to attach the edges of the circle here. Use your finger to push the crease line open and bring the outside edges together. Use another Mini Glue Dot to attach the tips together about 1/2" from the edge. Stamp your sentiments on a narrow strip of Whisper White cardstock and then add a banner tip with the My Way Punch. Adhere to the inside of the Fortune Cookie with a Mini Glue Dot.
 Actually, this little Flower Notebook may be my favorite treat from this ensemble! Again, this is a quick and easy item to make - a must have for Birthday Favors, right?! Big Shot to the rescue - I used the Flower Die for the Big Shot to cut several pieces of copy paper for the inside pages of this notebook. Then I adhered a piece of the pattern paper to a piece of the light weight chipboard backing that comes in the Designer Series Paper packs. I ran this through the Big Shot with the same Flower Die. I used a Bind It All here, but a Binder Ring clip would work just as well and the Crop-A-Dile will hole punch through all these layers. I stamped a little Page Marker with each girl's initial and attached that to a piece of ribbon tied to the binding.
Recipe:
Stamps: Friends Rock, Lovely Letters
Cardstock: Melon Mambo, Dusty Durango, Whisper White, Sweet Pea DSP
Ink: Dusty Durango, Melon Mambo
Accessories: Flower Die for the Big Shot, Dusty Durango Polka Dot Ribbon, Scallop Circle, 1 3/8 Circle and 1 1/4" Circle Punches, Bind It All


4 comments:
Thanks for the instructions! I really love those fortune cookies (and bonus, they're calorie free!)
How did I miss the fortune cookies during the hop? Those are TOO CUTE!
Thanks for the instructions, Mary! I love those fortune cookies too! Very cute idea!
Mary, these are great projects. Thanks for posting the directions. I've got a friend that just found out she has breast cancer and will be looking at radiation therapy. I think I'll be making the chapstick holder and the match book holder for some tea. I think she'll really like that.
Post a Comment