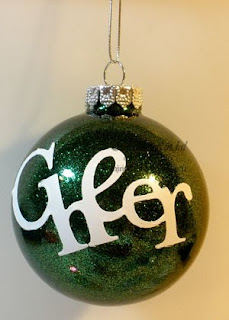
What do you think of these beauties? Can you see the Glitter and Sparkle?! These Glitter Ornaments can be made in ANY of the Stampin' Up! colors - I used Rich Razzleberry, Mellow Moss for these two and Garden Green on the one below. The words are made using the Stampin' Up! Big Shot Join In The Cheer Sizzlet Die and Stampin' Up!White Decor Element Sheets. Oh, they are SO FUN!
These Glitter Ornaments and a few other gorgeous gifts are part of my upcoming Giftables Class - perfect presents for last minute Friends, Family or even Hostess Gifts. There will be three to choose from and you can make as many as you'd like or as many as you need! Check back next week to see the other Gift Projects.
I loved making these Glitter Ornaments and they even caught my daughter's interest! They're so easy that she can make as many as she'd like without me hovering over her or any direct supervision - just the kind of crafting she loves!
Don't forget the Online Extravaganza Sale ends on Monday - be sure to check out the HUGE Sale on Stampin' Up! bundled products. You can shop by going to my website at mjrindal.stampinup.net and clicking on the SHOP NOW button in the upper right corner.
Friday, November 27, 2009
Thursday, November 26, 2009
A Stampin' Up! Ornament
I'm sure I've mentioned it a FEW times before, how much I love Stampin' and Scrappin' and Stampin' Up! and the wonderful relationships I built through stampin'. However, I can't say it enough how much I LOVE spending time stampin and creating with friends and how THANKFUL I am for my Stampin' Up! customers, friends and downline.
The Stampin' Up! Statement of Heart sums it up perfectly for me,
A big part of that 'difference' is in me - it makes me happy every time I stamp with friends or when they share with me, what they have stamped. So, THANK YOU! for making a difference for me!
This gift box is the 2009 Stampin' Up! Ornament that I gave to my downline this year. I created a simple gift tag using the Delightful Decorations stamp set and the Ornament Punch - It is stamped in Real Red Craft Ink and covered with Iridescent Ice Embossing Powder, so a little extra sparkle. I added the Merry Christmas Banner and tied it on with the gorgeous Black Striped Ribbon and Silver Cord. This ornament is available only to Demonstrators, and I hope it reminds my ladies of how much fun we have getting together to stamp every month at our Demo Get Togethers.
From Stampin' Up!:
The Stampin' Up! Statement of Heart sums it up perfectly for me,
"To love what we do and share what we love, as we help others enjoy creativity and worthwhile accomplishments . . . in this we make a difference."
A big part of that 'difference' is in me - it makes me happy every time I stamp with friends or when they share with me, what they have stamped. So, THANK YOU! for making a difference for me!
This gift box is the 2009 Stampin' Up! Ornament that I gave to my downline this year. I created a simple gift tag using the Delightful Decorations stamp set and the Ornament Punch - It is stamped in Real Red Craft Ink and covered with Iridescent Ice Embossing Powder, so a little extra sparkle. I added the Merry Christmas Banner and tied it on with the gorgeous Black Striped Ribbon and Silver Cord. This ornament is available only to Demonstrators, and I hope it reminds my ladies of how much fun we have getting together to stamp every month at our Demo Get Togethers.
From Stampin' Up!:
Have yourself a merry little Christmas with this beautiful ornament based on the Delightful Decorations stamp set. Not only will it be a cherished keepsake you can use year after year, but $2 from the sale of each ornament will be donated to Operation Christmas Child. Operation Christmas Child delivers joy and hope to children in desperate situations throughout the world by distributing gift-filled shoe boxes.
Tuesday, November 24, 2009
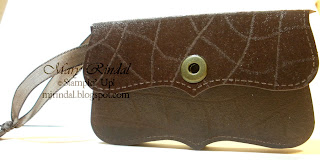
Faux Leather Technique
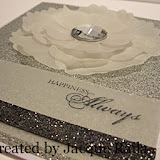
For my November Technique Club, we stamped using Embossing Powder different ways. This month we made three cards, using the Cracked Glass Technique with Stampin' Up! Glassy Glaze Embossing Powder, the Diamond Dust Technique and the Faux Diamond Dust Technique, and then created this adorable little wristlet using the Faux Leather Technique.
So much embossing going on, I was sure my Heat Gun was just going to give up, but no worries, he melted Embossing Powder all night long!
To create this wristlet, I use a Brayer to apply VersaMark ink from the VersaMark pad to cover three pieces of Chocolate Chip cardstock. Then cover the VersaMarked cardstock with Clear Embossing Powder and tap off the excess. Use a Bone Folder to draw the irregular leather grain lines into the surface of the cardstock, removing the Clear Embossing Powder as you 'draw.' Then use the Heat Gun to melt the Embossing Powder. Finally, run these three pieces of Faux Leather through the Big Shot with the Top Note die and assemble with an inner box to create this lovely.
Each month at Technique Club, my club members receive one or more instruction cards (FIVE this month!) with details of the techniques we are learning. They keep those cards in a notebook or in baseball card protectors, so they can refer to them again and again. If you are in my area of Colorado and are interested in joining Technique Club and receiving Hostess Benefits, please use the E-Mail Me button on the right toolbar to contact me. I would love to hear from you!
Monday, November 23, 2009
Holiday Online Extravaganza!
Huge Holiday Sale!
Get up to 50 percent off select products and product bundles. But hurry—the Online Extravaganza ends November 30!
Visit my Online Store to get great deals now! Go to mjrindal.stampinup.net and click on the SHOP NOW button in the upper right corner.
Friday, November 20, 2009
Autumn Scrapbooking
This is one of my favorite pages from my November Scrap Class. It uses the Big Shot Leaves #2 Die from Stampin' Up! and an acorn created from the Ornament Punch. I based this scrapbook layout on a beautiful card created by Lynn Pratt, a Stampin' Up! Demonstrator.
The base of this page is Not Quite Navy and all four edges are distressed using the Cutter Kit. I stamped the Sanded background stamp onto strips of Naturals Ivory cardstock. The mat for the 5x7 photo is Soft Suede and is also distressed with the Cutter Kit. I die cut several leaves from the Leaves #2 Die for the Big Shot in Crushed Curry, Old Olive and Dusty Durango, then sponged the edges with Soft Suede ink using a Sponge Dauber.
The Pumpkin and the Acorn elements are both created using punches - Wide Oval, Large Oval, and Ornament Punches - and sponged. I stamped the title in Chocolate Chip ink using the Schoolbook Serif Alphabet set and finished the Title Bar with Jumbo Eyelets. The Give Thanks tab is from the Level I Hostess set Holiday Best.
Thursday, November 19, 2009
Rolodex Birthday!
OHHHH! WOWEEE! Did you hear a scream last night?! It was me. I picked up my mail late last night and there was a box in there and I couldn't read the return address in the dark. And then it was taped, very, very well taped, so I had to find a razor to get into it....and then....and then I pulled out this Lovely! oh, it made me so happy, I really did scream and my daughter almost had a heart attack! lol But I was happy!
This Beauty was sent to me from Kay Kalthoff, who I am privileged to call friend. Kay is a Rising Star demonstrator who I met in Minnesota. She also attended Founder's Circle this year - and well earned, she is one amazing demonstrator and such a wonderful lady and wife and mom and teacher, too!
This Perpetual Birthday Calendar is made with the Stampin' Up! Rolodex die cut and the Full Calendar stamp set. I just LOVE IT! Thank you Kay!
Wednesday, November 18, 2009
Medallion Sympathy
This card is a Sympathy card I made for a swap with my Technique Club ladies. A few of them do a swap each month on our Club night and this month's theme was Sympathy Cards. I used the Stampin' Up! Window Sheets and the Medallion stamp set as well as a few others.
The card base of this card is Soft Suede stamped with the En Francais background stamp in Soft Suede ink. I added a mat strip of Kraft cardstock and a piece of the gorgeous Soft Suede pattern paper from the Thoroughly Modern Designer Series Paper. The sentiment is from the Teeny Tiny Wishes stamp set, stamped in Soft Suede ink onto Kraft cardstock. This is punched out with the Small Oval Punch and adhered to the card front. I cut an 8 1/2 x 11 piece of Window Sheet and folded/scored it well. Then I stamped the fold edge with the Medallion stamp and White StazOn ink. The StazOn ink is necessary because the plastic Window Sheet doesn't allow other inks, Craft or Classic, to dry on its surface. I held the layers together and punched two holes at the top and bottom with the 1/16th Punch. Then a few loops of the Gold Elastic Cord, from the Holiday Mini Catalog, and a knot to keep them all together.
Tuesday, November 17, 2009
Happy Birthday Cupcake!
How about this cute little wine bottle gift? This cupcake labeled wine was so cute, I thought. And just the gift for a good friend of mine. I added a Gift Tag with lots of sparkle - I hope she enjoys it!
The tag is from the Two Tags die cut for the Stampin' Up! Big Shot with Textured Brilliant Blue cardstock. I colored the large cupcake image from Crazy for Cupcakes in Brilliant Blue and YoYo Yellow. Then added some Chunky Glitter with my Two Way Glue Pen. The Scallop Circle Punch is layered with an image from one of last year's Sale-A-Bration sets and the label is one of the definitions images from Define Your Life stamp set. I covered both with VersaMark and Iridescent Ice Embossing Powder for even more bling. The tie is a piece of the beautiful, shimmery Organza Ribbon.
I saw a sneak peek of the upcoming Sale-A-Bration Mini Catalog and mmmm, mmmm, mmmm - I'm so excited! Some great sets and fun surprises! I can't wait to share it with you - the Sale-A-Bration event starts January 5th, 2010 and goes through March 31st, 2010.
Call me to set a date for your Sale-A-Bration workshop in January or February - I've got some fabulous Hostess Bonuses for hostesses who book their workshops now!
Saturday, November 14, 2009
Stair Step card
This Stair Step card is one I made for a Stampin' Up! Demonstrator swap, All in the Fold, on Stampin' Addicts - a website for Stampin' Up! stampers and demonstrators. I used the Stampin' Up! sets Spring Song and Oval All with the Tea Party Designer Series Paper.
This particular swap is for fancy folds cards and I signed up in two groups - one for the Stair Step fold and other for the Swing Fold. I'll be posting my Swing Fold card soon - I have the protype done for my swap, I just need to stamp out the 7 needed for the swap.
The measurements for this card are as follows:
Card Base: 5 1/2 x 8 1/2
Cut:
I added a strip of the striped paper from Tea Party DSP to the supporting side of the card and then a few layers of stamped images in the stair steps. The largest stamped image is the hummingbird from Spring Song and is stamped in Almost Amethyst ink to be a watermark like image that can be used for the writing area of the card. The 'fabulous FRIEND' stamp is one of the images from Oval All stamped in Elegant Eggplant and then punched out with the Large Oval Punch. I layered it on to a Certainly Celery mat punched with the Scallop Oval Punch. The hummingbird image is stamped again, flower stem only, along the bottom of the card. Then I stamped the sentiment from Spring Song in Elegant Eggplant ink over this. The finishing touch - a piece of Certainly Celery 5/8" Grosgrain Ribbon knotted at the side.
This particular swap is for fancy folds cards and I signed up in two groups - one for the Stair Step fold and other for the Swing Fold. I'll be posting my Swing Fold card soon - I have the protype done for my swap, I just need to stamp out the 7 needed for the swap.
The measurements for this card are as follows:
Card Base: 5 1/2 x 8 1/2
Cut:
- at 3 1/2 from 1 1/4 to 6 1/4
- at 1 1/4 from edge to 3 1/2 cut line
- at 2 1/4 from edge to 3 1/2 cut line
- at 3 1/4 from edge to 3 1/2 cut line
- at 6 1/4 from edge to 3 1/2 cut line
I added a strip of the striped paper from Tea Party DSP to the supporting side of the card and then a few layers of stamped images in the stair steps. The largest stamped image is the hummingbird from Spring Song and is stamped in Almost Amethyst ink to be a watermark like image that can be used for the writing area of the card. The 'fabulous FRIEND' stamp is one of the images from Oval All stamped in Elegant Eggplant and then punched out with the Large Oval Punch. I layered it on to a Certainly Celery mat punched with the Scallop Oval Punch. The hummingbird image is stamped again, flower stem only, along the bottom of the card. Then I stamped the sentiment from Spring Song in Elegant Eggplant ink over this. The finishing touch - a piece of Certainly Celery 5/8" Grosgrain Ribbon knotted at the side.
Wednesday, November 11, 2009
In Honor of Veteran's Day
Here is card shared from Stampin' Up! demonstrator website - stamped by Donna Johnson. I think we need to remember every day the sacrifices so many brave men and women have made in order for each of us to enjoy the freedoms and liberties that we take advantage of every day in this great country. Thank you to every current and former military person and to their family members for the service and protection they provide.
Monday, November 9, 2009
Big Shot with Fabric
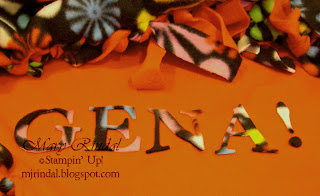
Using the Stampin' Up! Big Shot to cut fabric is SO easy! My daughter had a definite plan for her Christmas gifts for two of her friends in Minnesota. She tied these fleece blankets for them today, after spending a LONG time at the fabric store shopping for just the right (crazy pattern with vivid colors) designs for each friend.
Then she used the scrap fabric, with the Serif Essentials Bigz letters and to die cut the letters of their names. She glued them to the fleece with Crystal Effects. Easy peasy and she's pretty happy with the results! (and way ahead of me on crossing things off her Christmas Gift List!)
If you're starting to feel the crunch on getting some Christmas Gifts crossed off your list, be sure to check My Events schedule, as I have a Bags, Tags and Boxes class coming up soon, as well as another Gifts class the first week of December. I'd love to see you at any of my Stampin' Events or help you plan some Gift Giving ideas. Be sure to browse the Holiday Extravaganza Gift Guide and choose a FREE Decor Element with every $50 you spend from it. Remember you can shop anytime with my Online Shopping.
Happy Stampin'!
Friday, November 6, 2009
Bags, Tags & Boxes
Bags, Tags & Boxes Buffet Style Class
Saturday, November 21 at 6:30 pm
RSVP required by November 16th
This is a fun Holiday class to create a handful (or two!) of beautiful Christmas tags, a fun little tin for those tags, or choose from a variety of other bags and boxes. You'll love the creative and beautiful gift giving ideas. Also, you get to choose which items you want to make and how many of each!
Embossed Skinny Tin $5
This beautiful Tin with it's elegant Snowflake embossing and ornament front is easy to create. Finished off with a Ribbon handle, it will hold a handful of Gift Tags, or even a Gift Card for your recipient. {About 5" wide and less than 1" thick -not quite large enough to hold regular sized cards. }
Decorations Gift Tags, set of 6 $2
Stamp, punch and tie Silver or Gold Cord onto these beauties and you'll have the most elegant Gift Tags under the tree.
Assorted Christmas Punch Tags 5 for $1
Stamp, punch and tie Silver or Gold Cord to create a handful of fun Gift Tags for all your gifts. Finish them with a spray from the Shimmer Paint Spray to add extra sparkle. Stamping at it's purest.
Magnetic Gift Box & Tag $3
Add a piece of the yummy Chocolate Striped Ribbon and a folded Tag from the Big Shot to the Magnetic Gift Boxes from Stampin' Up! and you have a gift packaging ready to go in no time.
{with tag opened}
Round Tin with a Mini Scrapbook $12
My favorite project in this class! The circular tin is so fun and I just love the Scallop Circle Mini Album inside! The loop of ribbon gets you to open the album, which lifts out accordian style. Choose your last name, like I did here, or use a Holiday Phrase, such as Noel, Peace, Love, Joy, whatever you can think of. Then add your photos and smile as you watch the recipient of your gift light up.
Round Gift Tin alone (without mini album) $5
This round tin is the perfect size to hold a Christmas CD as well! Share your wonderful photos from the year on a CD and package it as a lovely gift with this Round Tin.
{For an idea of the size, the round embellishment on the lid of this tin is 4" across.}
Box in a Bag $4
How adorable is this little bag with its round tab closure and ribbon tie? Embellish with the Sizzlets and Christmas Punch sentiment of your choice. This bag has a sturdy little box in the bottom to hold plenty of gifts. {About 6" high}
Ornament Tag $2
Create as many as you'd like of this beautiful Ornament Tag and then finish it with your own photo for a personal tag, that is a gift in itself. Or make several and package them in the Round Gift Tin for a wonderful set of Photo Ornaments.
Top Note Coaster Tag $2
This oversize tag is a cinch to create using the Big Shot machine to cut the Top Note and Oval shapes. Add the beautiful Tree Trimmings stamps and a Holiday Greeting banner and you have a show stopper.
Treat Box with Tag $2
This is a coated, food-safe treat box from Stampin' Up! Super quick and super easy to assemble, create this beauty in no time. Fill it with treats and goodies for a wonderful hostess or neighbor gift. {About 6 inches tall.}
Gift Tag & Recipe Card $4
Another favorite of mine, this ensemble is perfect for those treats you give this time of year. Give the gift of your recipe with this fun Recipe card and coordinating Gift Tag.
Saturday, November 21 at 6:30 pm
RSVP required by November 16th
This is a fun Holiday class to create a handful (or two!) of beautiful Christmas tags, a fun little tin for those tags, or choose from a variety of other bags and boxes. You'll love the creative and beautiful gift giving ideas. Also, you get to choose which items you want to make and how many of each!
Embossed Skinny Tin $5
This beautiful Tin with it's elegant Snowflake embossing and ornament front is easy to create. Finished off with a Ribbon handle, it will hold a handful of Gift Tags, or even a Gift Card for your recipient. {About 5" wide and less than 1" thick -not quite large enough to hold regular sized cards. }
Decorations Gift Tags, set of 6 $2
Stamp, punch and tie Silver or Gold Cord onto these beauties and you'll have the most elegant Gift Tags under the tree.
Assorted Christmas Punch Tags 5 for $1
Stamp, punch and tie Silver or Gold Cord to create a handful of fun Gift Tags for all your gifts. Finish them with a spray from the Shimmer Paint Spray to add extra sparkle. Stamping at it's purest.
Magnetic Gift Box & Tag $3
Add a piece of the yummy Chocolate Striped Ribbon and a folded Tag from the Big Shot to the Magnetic Gift Boxes from Stampin' Up! and you have a gift packaging ready to go in no time.
{with tag opened}
Round Tin with a Mini Scrapbook $12
My favorite project in this class! The circular tin is so fun and I just love the Scallop Circle Mini Album inside! The loop of ribbon gets you to open the album, which lifts out accordian style. Choose your last name, like I did here, or use a Holiday Phrase, such as Noel, Peace, Love, Joy, whatever you can think of. Then add your photos and smile as you watch the recipient of your gift light up.
Round Gift Tin alone (without mini album) $5
This round tin is the perfect size to hold a Christmas CD as well! Share your wonderful photos from the year on a CD and package it as a lovely gift with this Round Tin.
{For an idea of the size, the round embellishment on the lid of this tin is 4" across.}
Box in a Bag $4
How adorable is this little bag with its round tab closure and ribbon tie? Embellish with the Sizzlets and Christmas Punch sentiment of your choice. This bag has a sturdy little box in the bottom to hold plenty of gifts. {About 6" high}
Ornament Tag $2
Create as many as you'd like of this beautiful Ornament Tag and then finish it with your own photo for a personal tag, that is a gift in itself. Or make several and package them in the Round Gift Tin for a wonderful set of Photo Ornaments.
Top Note Coaster Tag $2
This oversize tag is a cinch to create using the Big Shot machine to cut the Top Note and Oval shapes. Add the beautiful Tree Trimmings stamps and a Holiday Greeting banner and you have a show stopper.
Treat Box with Tag $2
This is a coated, food-safe treat box from Stampin' Up! Super quick and super easy to assemble, create this beauty in no time. Fill it with treats and goodies for a wonderful hostess or neighbor gift. {About 6 inches tall.}
Gift Tag & Recipe Card $4
Another favorite of mine, this ensemble is perfect for those treats you give this time of year. Give the gift of your recipe with this fun Recipe card and coordinating Gift Tag.
Thursday, November 5, 2009
Embossed Tin
Ink Stamps, a bit of paper and some Iridescent Ice Embossing Powder is all it takes to create this beauty. The tin is a Silver Skinny Tin from Stampin' Up! that I jazzed up with some Embossing, a Ribbon handle, and some stamping.
{and inside this beauty}
These tins are just a little bit too small to hold regular sized cards, but are a fun size for so many other things. I filled my finished tin with Gift Tags. However, you could also put a Gift Card inside here, several Ghiradelli Chocolates will fit, and the mini Notecards from Stampin' Up! also fit in here.
Here are a few of my tags - I used the colors of Rich Razzleberry and Night of Navy together with both Whisper White and Very Vanilla and tied them with Gold and Silver Cord. The stamped ornaments are from the Delightful Decorations set in the Holiday Mini Catalog. The coordinating punch, Ornament Punch, gave me the adorable shape of these tags so easily!
This beautiful tin and these tags will be just two of the many items you can make at my upcoming Bags, Tags & Boxes Class on Saturday, November 21st. Watch my blog for more details tomorrow, including photos of each of the class projects. This will be a Buffet Style Class, so you get to choose which projects and how many to make!
Sunday, November 1, 2009
Holiday Extravaganza!
Get a FREE Decor Elements piece, valued up to $16.95, when you spend $50 on products in the Gift-Giving Guide. With perfect gifts for just about everyone on your holiday list, Stampin' Up! is your one-stop holiday shop! Shop online anytime at my Stampin' Store!
Shop the Gift-Giving Guide Now
Subscribe to:
Posts (Atom)